1: Login Screen
‣ At the start page add Email and Password and press login button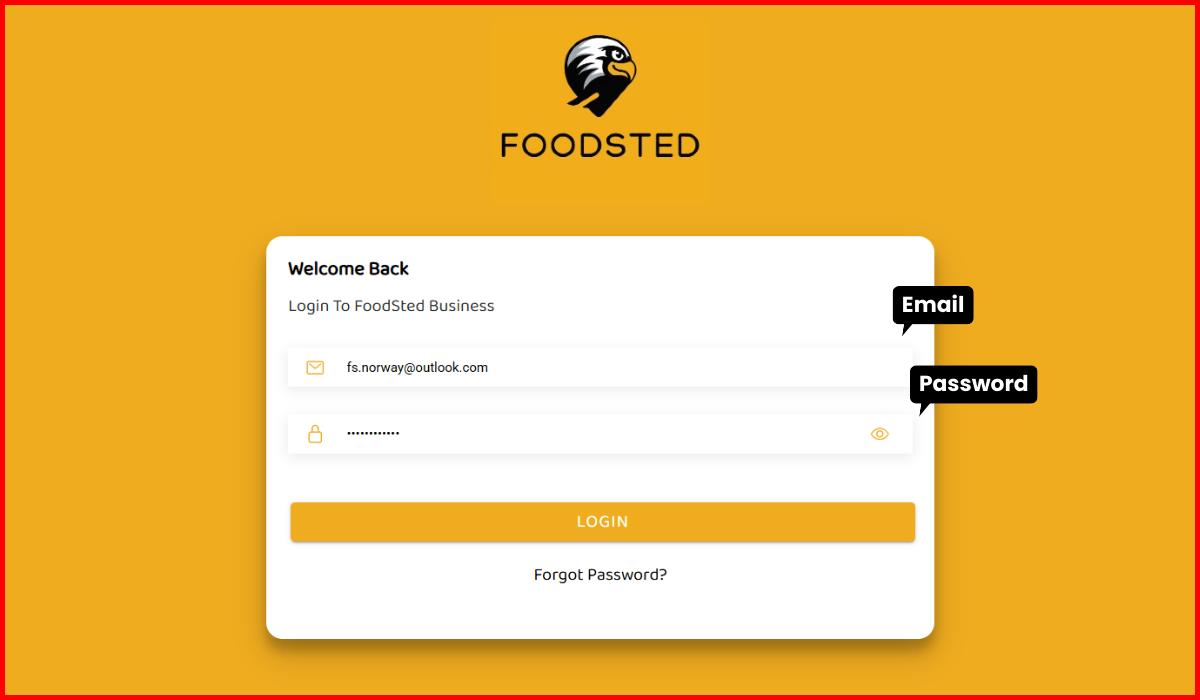
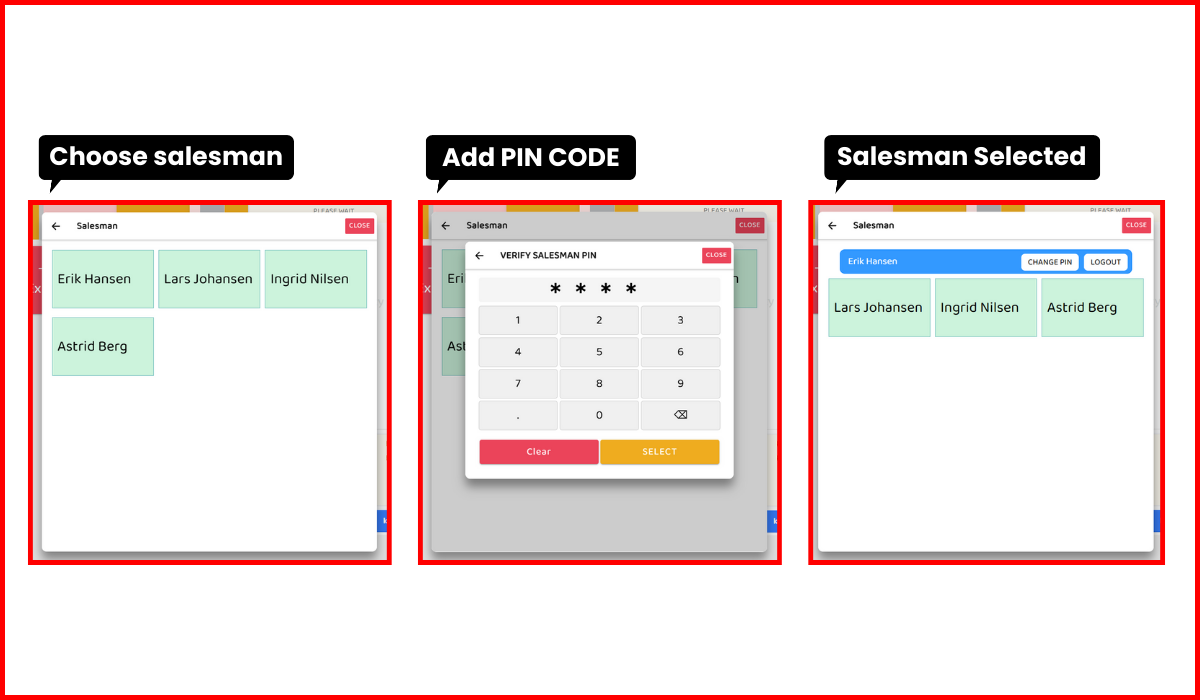
2: Salesman Selection
‣ After login salesman pop-up will appear automatically
‣ Select any salesman
‣ Add PIN code
‣ After PIN Salesman Selected
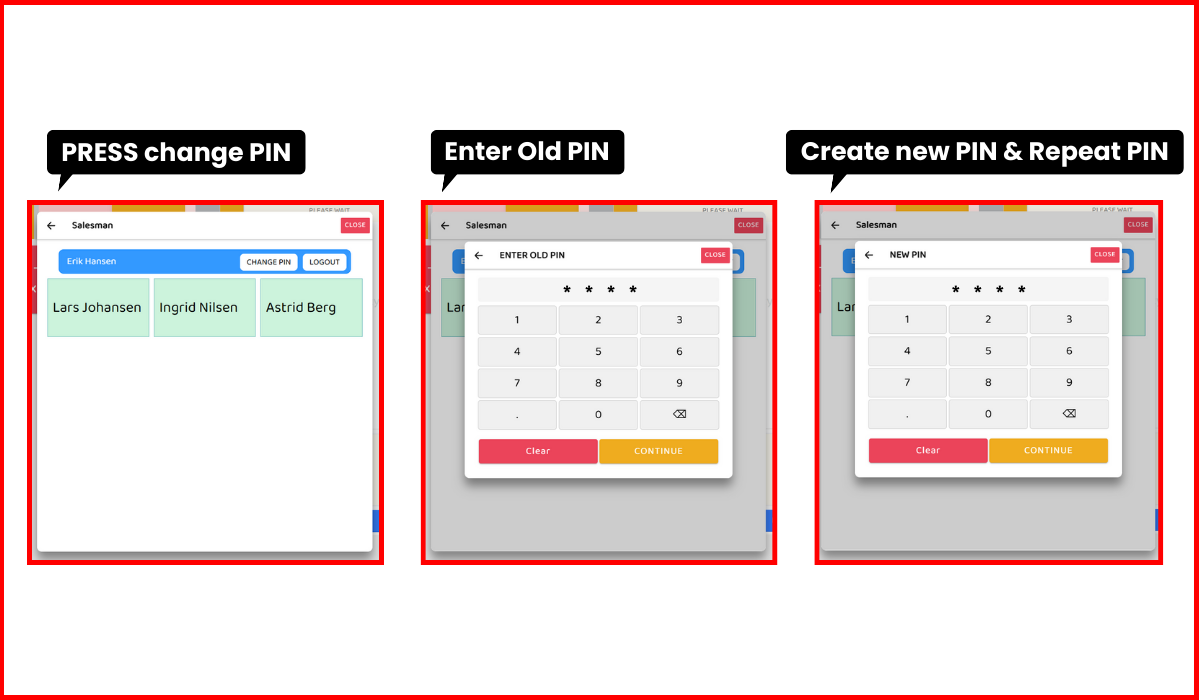
2.1: Change Salesman PIN
‣ Pressing at Change PIN it ask to provide old PIN‣ Add the New PIN
‣ Repeat New PIN
‣ PIN Changed
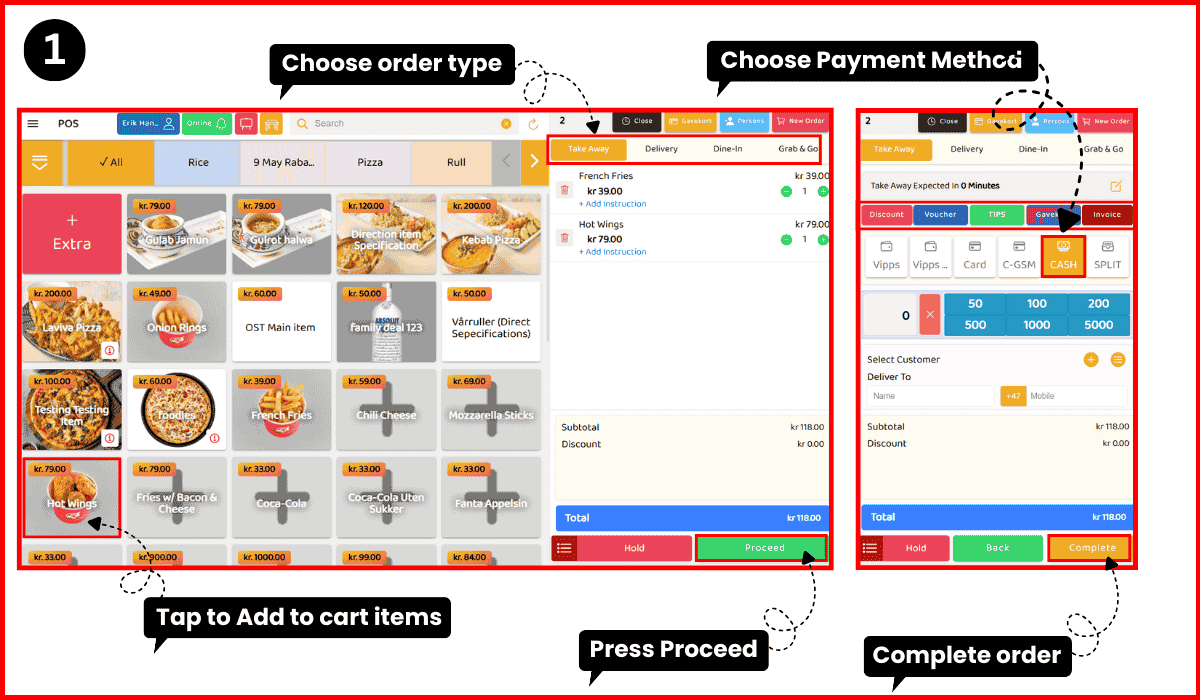
3: How to Proceed with Order?
‣ After login salesman POS screen opens automatically
‣ Choose the order type Takeaway, Delivery, Dine-in, Grab & Go
‣ Tap on items Add to cart
‣ Click Proceed Button
‣ Choose payment type
‣ There are additional options such as Discount, Voucher, Tips, Gift Card (Gavekort), and
Invoice
‣ Click complete Button
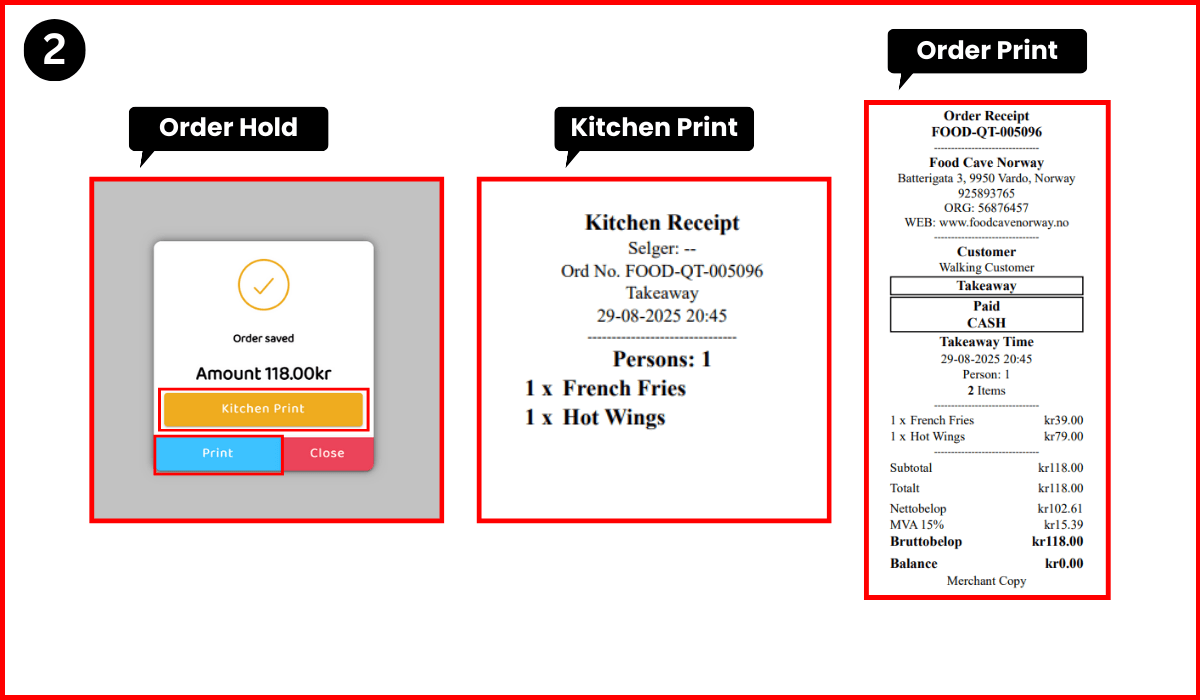
‣ Order placed successfully
‣ Click on Kitchen Print Button to print Kitchen receipt
‣ Click on Print Button to print Order receipt

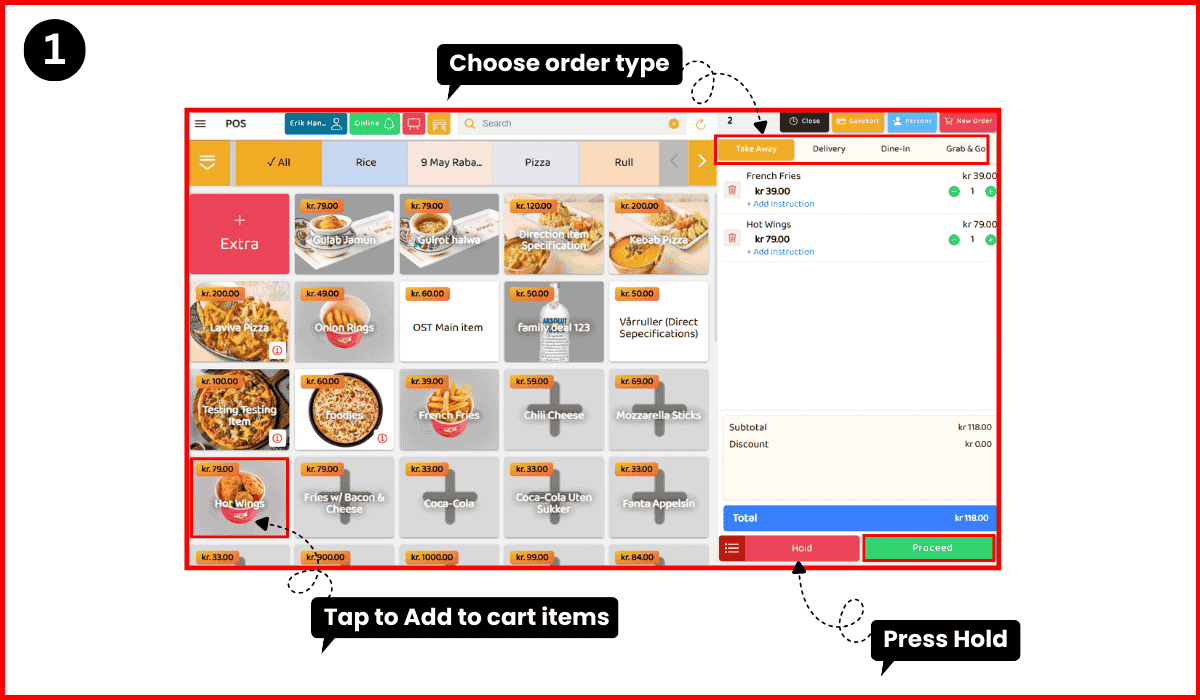
3.1: How to add your order in hold?
‣ Again Add to cart any items
‣ Choose the order type Takeaway, Delivery, Dine-in, Grab & Go
‣ Now Press Hold Button
‣ Order is now save in Hold orders
‣ Click on Kitchen Print Button to print Kitchen receipt
‣ Click on Print Button to print Order receipt
‣ Press 3 lines on the Hold button to check Hold orders and proceed according to a normal
order
4: Where can I check online orders?
‣ Open Side Menu of POS
‣ Click option #3 "Online Orders" as shown in image
‣ Click on "Online Orders"
‣ You'll see the New Orders, Accepted Orders and Upcoming orders there
‣ All new orders coming from app and web will shown at New Orders
‣ To accept New Orders just click on order and PRESS Accept Button
‣ When you accept New Order then your order will move to Accepted Orders.
‣ By click on the Accepted Order you can change the status of Order - Example you can
Decline, Ready and Delivered
‣ Upcoming Orders are used for advanced Table Booking - Your customers can book their tables
online if you offering Table Booking
‣ By clicking on it you can change Accept or Decline the Table Booking order
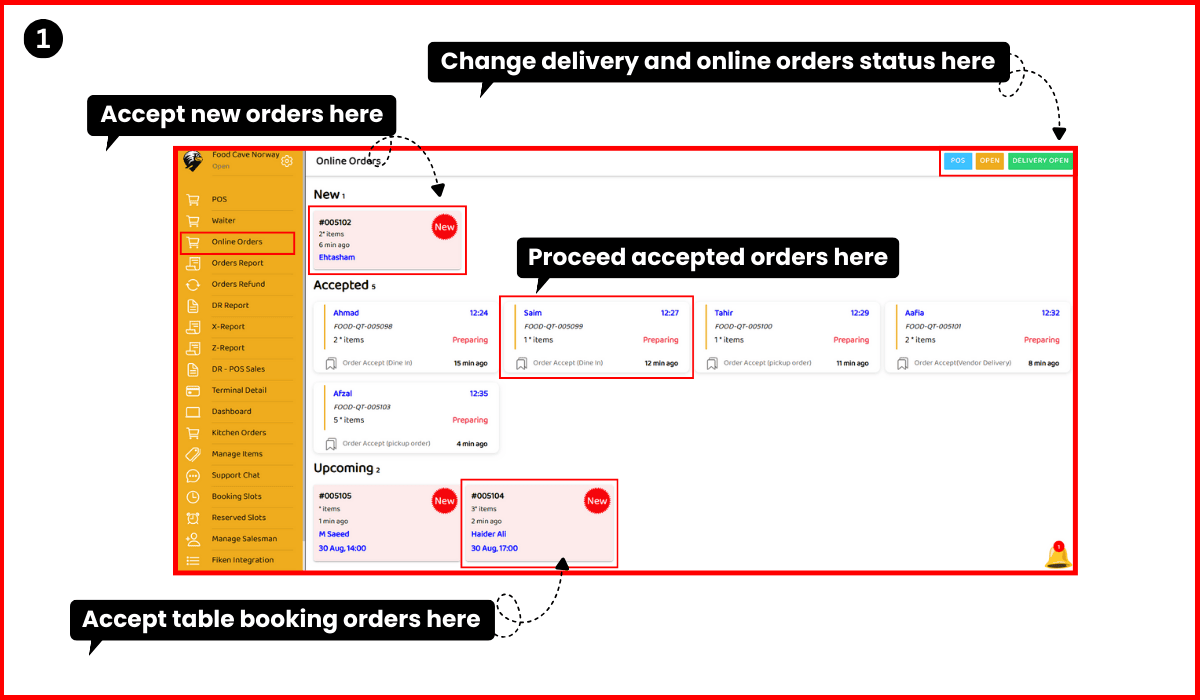
4.1: How to change Orders and Delivery status in Online Orders?
‣ 3 buttons are showing on the top right corner of Online Orders Page
‣ Click on "POS" to go back to the POS page
‣ Click on "OPEN" button to change the Online Orders status
‣ Click on "Delivery" button to change the Delivery status

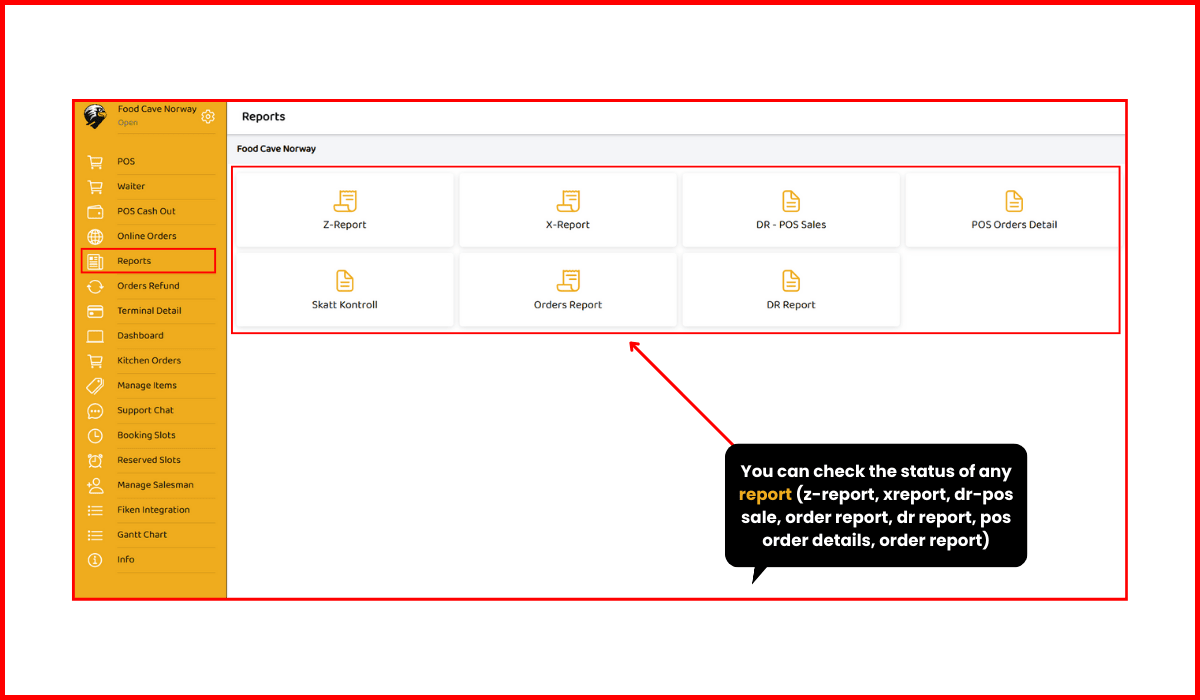
5: Where can i check the Reports (Z-Report, X-Report, DR-POS Sale, POS Orders Detail, Orders Report, Daily Settelment Report)?
‣ Open Side Menu of POS
‣ Click option #5 "Reports" as shown in image
‣ You can see different types of reports appeared in this page
‣ Click on any report you want to see results
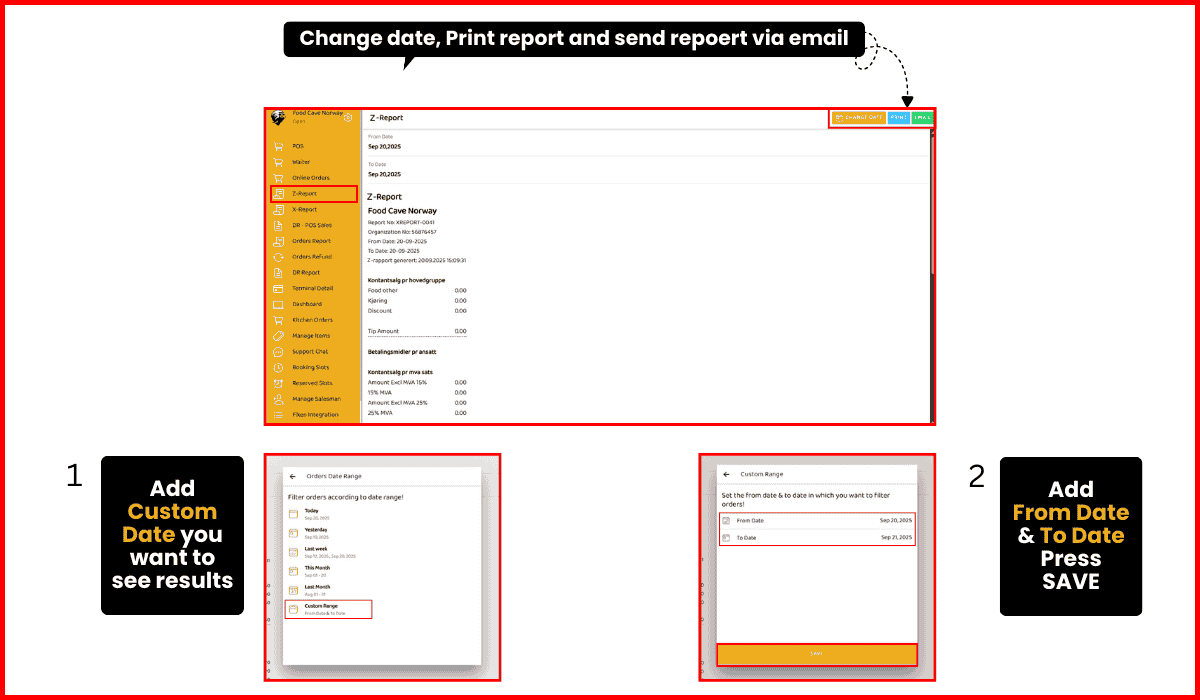
5.1: Where can i check the Z-Report?
‣ Open Side Menu of POS
‣ Click on Reports
‣ Now click on Z-Report
‣ Then you'll see the Z-Report Details
‣ Change Date → To change the report date range
‣ Click the Change Date Button
‣ Filter orders according to date range!
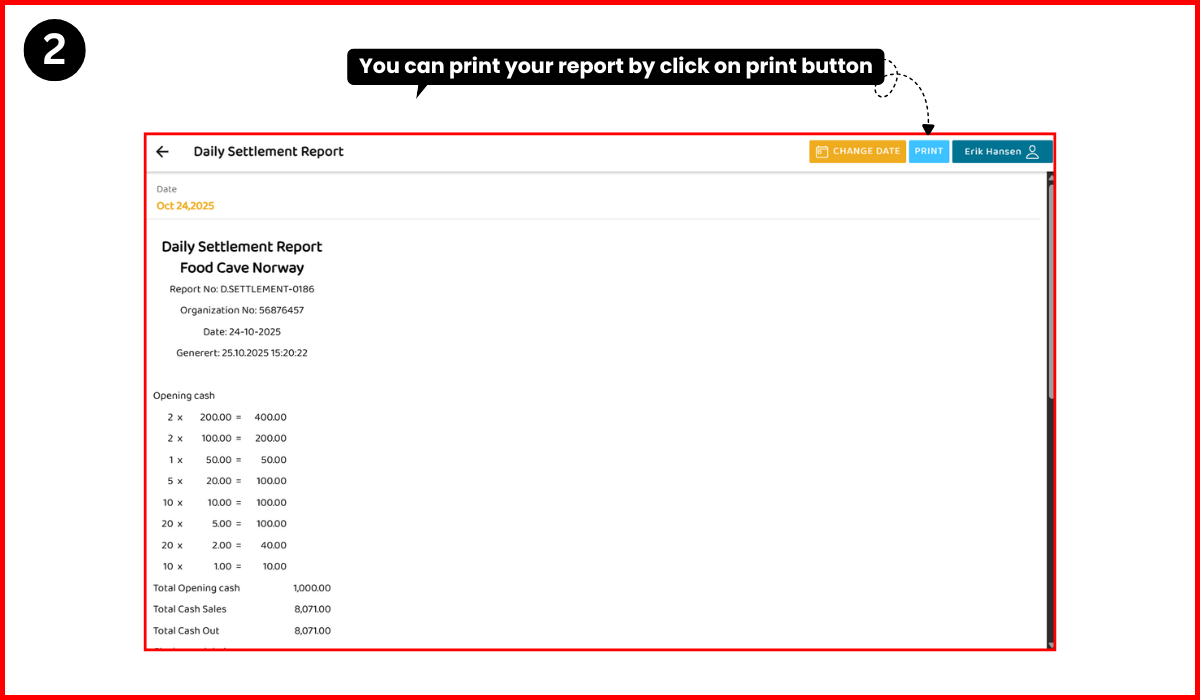
‣ Print → To print the report. Click the Print Button
‣ Then you'll see the Print Reciept
‣ Email → To send the report by email. Click the Email Button
‣ Then you'll see the email pop-up
‣ Click the Send Email Button
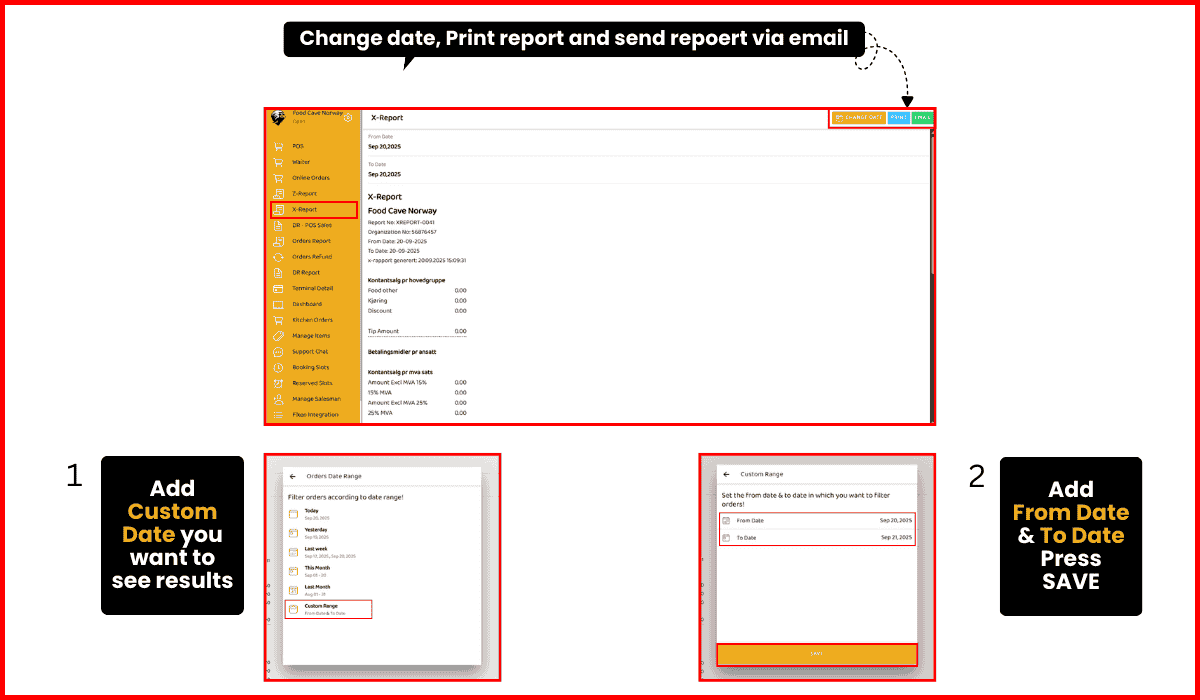
5.2: Where can i check the X-Report?
‣ Open Side Menu of POS
‣ Click on Reports
‣ Now click on X-Report
‣ Then you'll see the X-Report Details
‣ Change Date → To change the report date range
‣ Click the Change Date Button
‣ Filter orders according to date range!
‣ Print → To print the report. Click the Print Button
‣ Then you'll see the Print Reciept
‣ Email → To send the report by email. Click the Email Button
‣ Then you'll see the email pop-up
‣ Click the Send Email Button
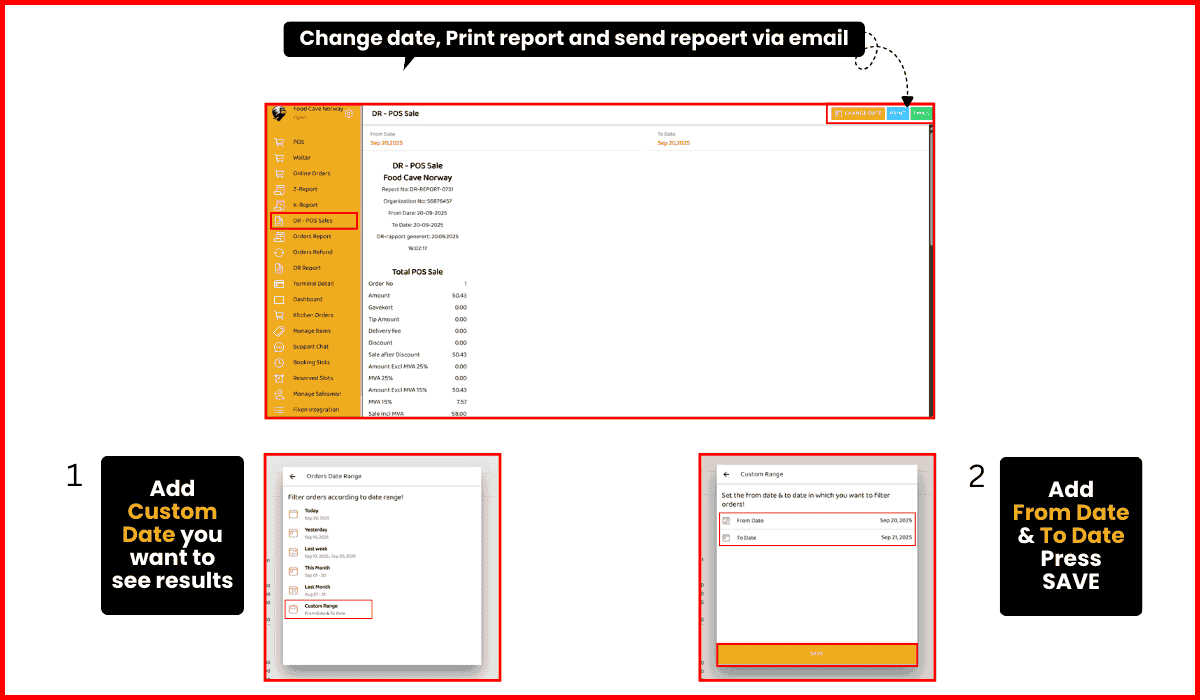
5.3: Where can i check DR-POS sales?
‣ Open Side Menu of POS
‣ Click on Reports
‣ Click on DR-POS Sales
‣ Then you'll see DR-POS Sale Report Details
‣ Change Date → To change the report date range
‣ Click the Change Date Button
‣ Filter orders according to date range!
‣ Print → To print the report. Click the Print Button
‣ Then you'll see the Print reciept
‣ Email → To send the report by email. Click the Email Button
‣ Then you'll see the email pop-up
‣ Click the Send Email Button
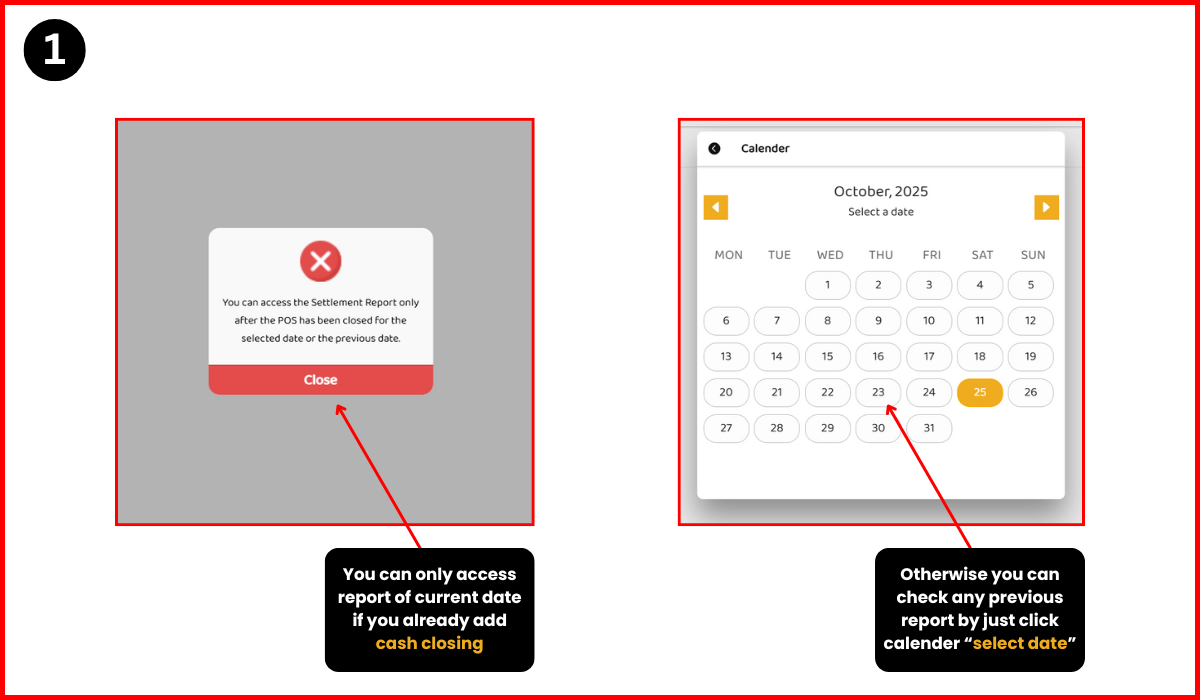
5.4: Where can i check Daily Sattelment Report?
‣ Open Side Menu of POS
‣ Click on Reports
‣ Click on Daily Sattelment Report
‣ You could able to open Daily Settelment Report of current day if you already added Cash Closing
‣ If you have not added the Cash Closing you can just check the previous dates Settelment Report
‣ To check any previous day Settelment Report just click on calendar and choose date
‣ Then you'll able to see the Settelment Report
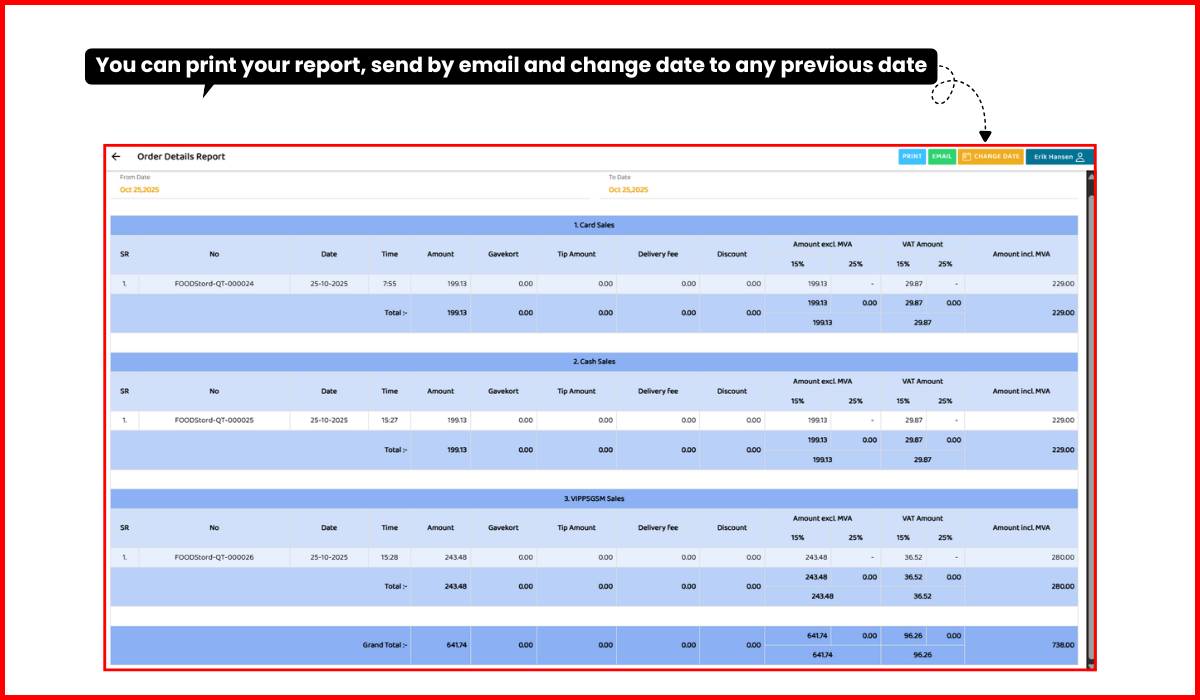
5.5: Where can i check POS Orders Detail?
‣ Open Side Menu of POS
‣ Click on Reports
‣ Click on POS Orders Detail
‣ Then you'll see POS Orders Detail
‣ Change Date → To change the report date range
‣ Click the Change Date Button
‣ Filter orders according to date range!
‣ Print → To print the report. Click the Print Button
‣ Then you'll see the Print reciept
‣ Email → To send the report by email. Click the Email Button
‣ Then you'll see the email pop-up
‣ Click the Send Email Button
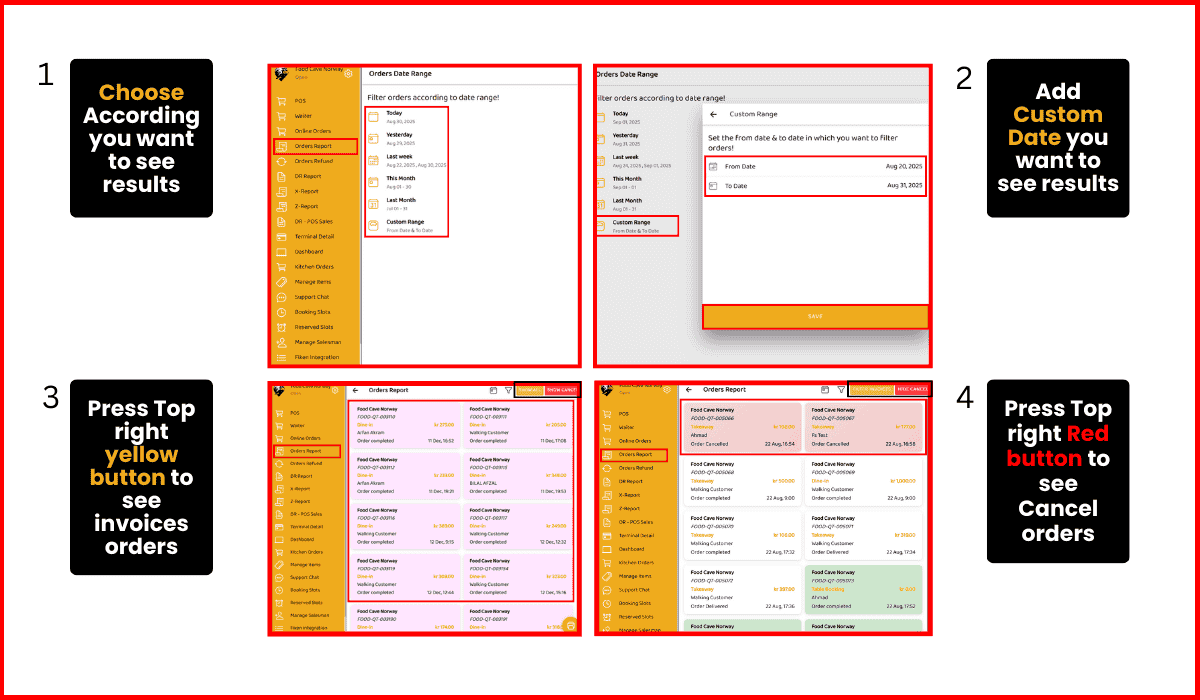
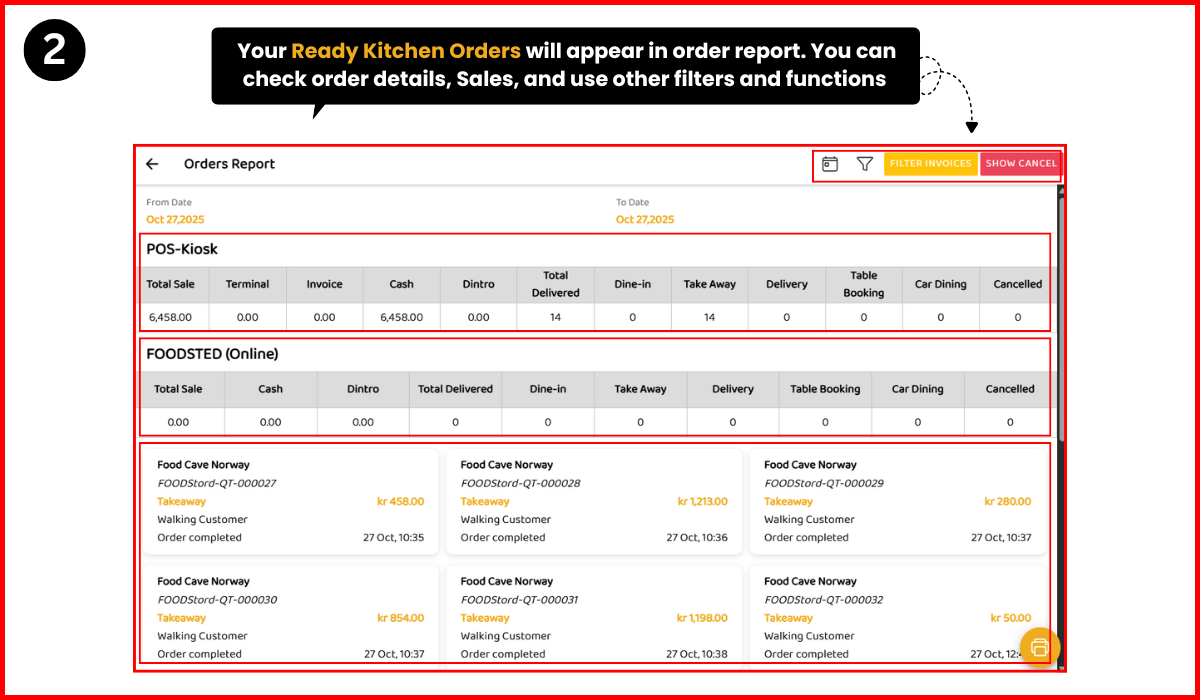
5.6: Where can i check the orders report?
‣ Open Side Menu of POS
‣ Click on Reports
‣ Click on Orders Report
‣ Filter orders according to date range!
‣ Click the Custom Range Option
‣ Set the from date & to date in which you want to filter orders!
‣ Press the Save Button
‣ Order Report Show you according to custom date range you entered in From Date to
To Date
‣ Click the Filter Invoices Button it will show all invoices
‣ Click the Show Cancel Button it will show all cancel orders
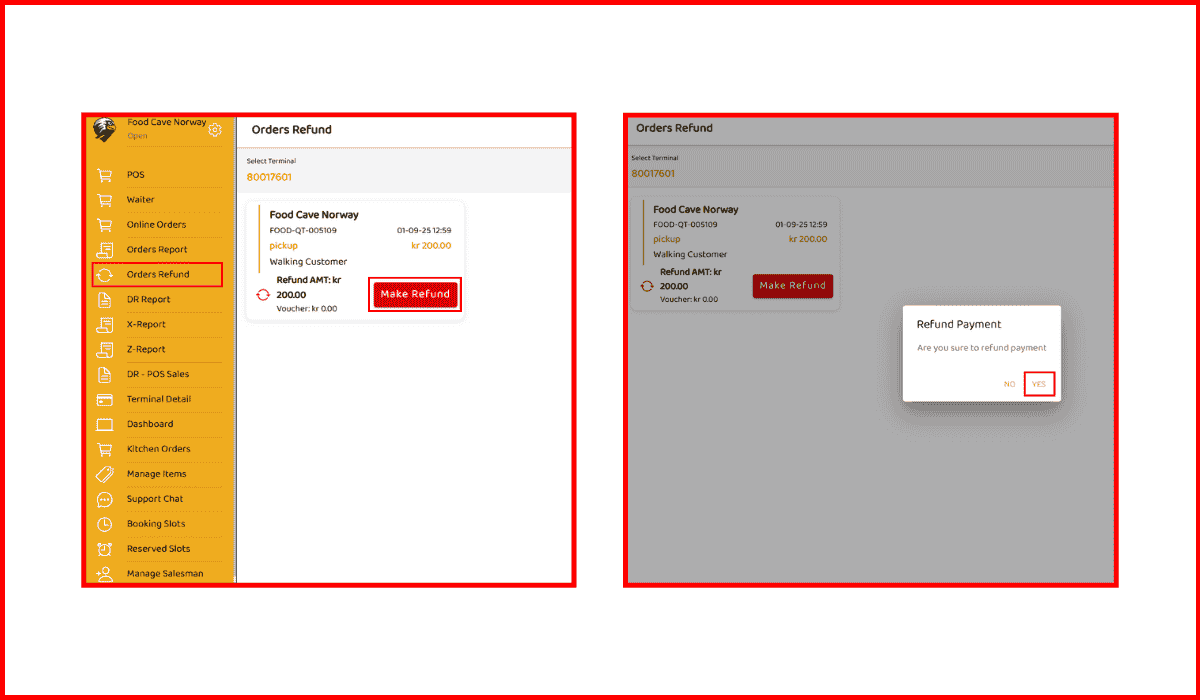
6: How can I refund an order?
‣ Open Side Menu of POS
‣ Click option #5 "Orders Refund" as shown in image
‣ This page shows orders with their refund amounts and an refund button to process refunds
‣ Click refund button a pop-up asks the user to confirm whether they want to proceed with
refunding the
payment
‣ Click Yes Button and a request on your payment terminal will come. Enter your card add pin
and order amount refunded successfully
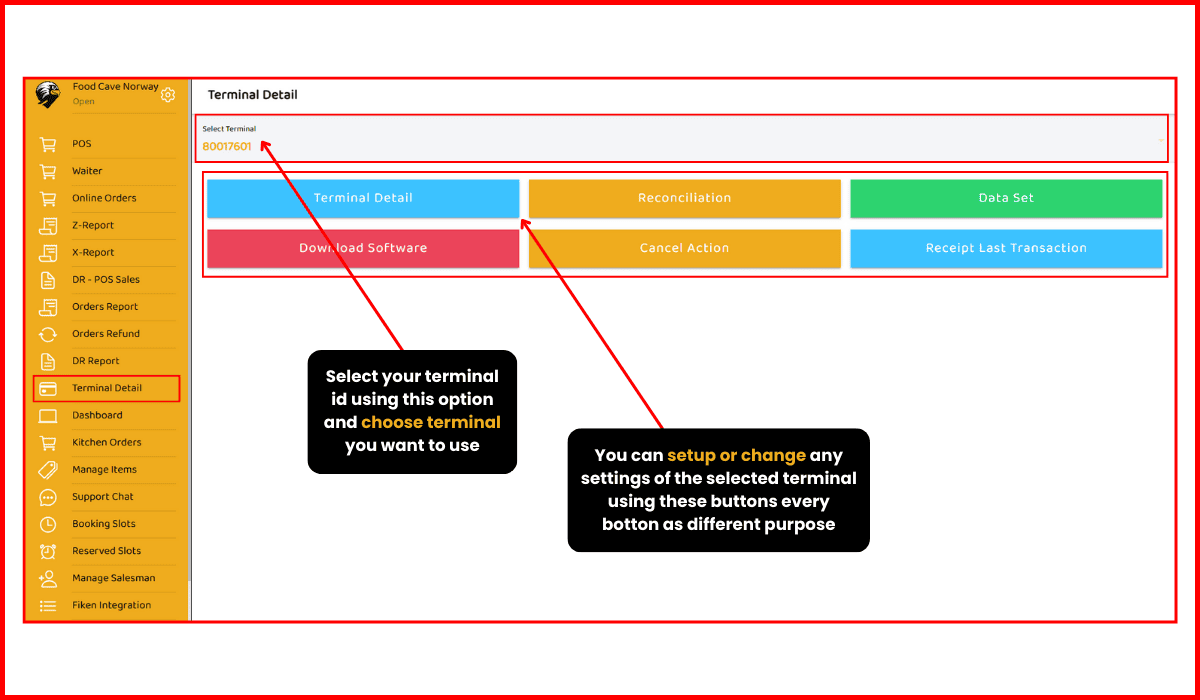
7: Terminal Detail
‣ Open Side Menu of POS
‣ Click option #9 "Terminal Detail" as shown in image
‣ Click the Terminal Detail Button
‣ Terminal Detail – view terminal information
‣ Then Show Terminal Status
‣ Click the Reconciliation Button. Reconciliation – settle or match transactions
‣ Click the Data Set Button
‣ Data Set – manage terminal data/settings
‣ Click the Download Software Button
‣ Download Software – update/download terminal software
‣ Click the Cancel Action Button
‣ Cancel Action – cancel an operation
‣ Click the Receipt Last Transaction Button
‣ Receipt Last Transaction – print the last transaction receipt
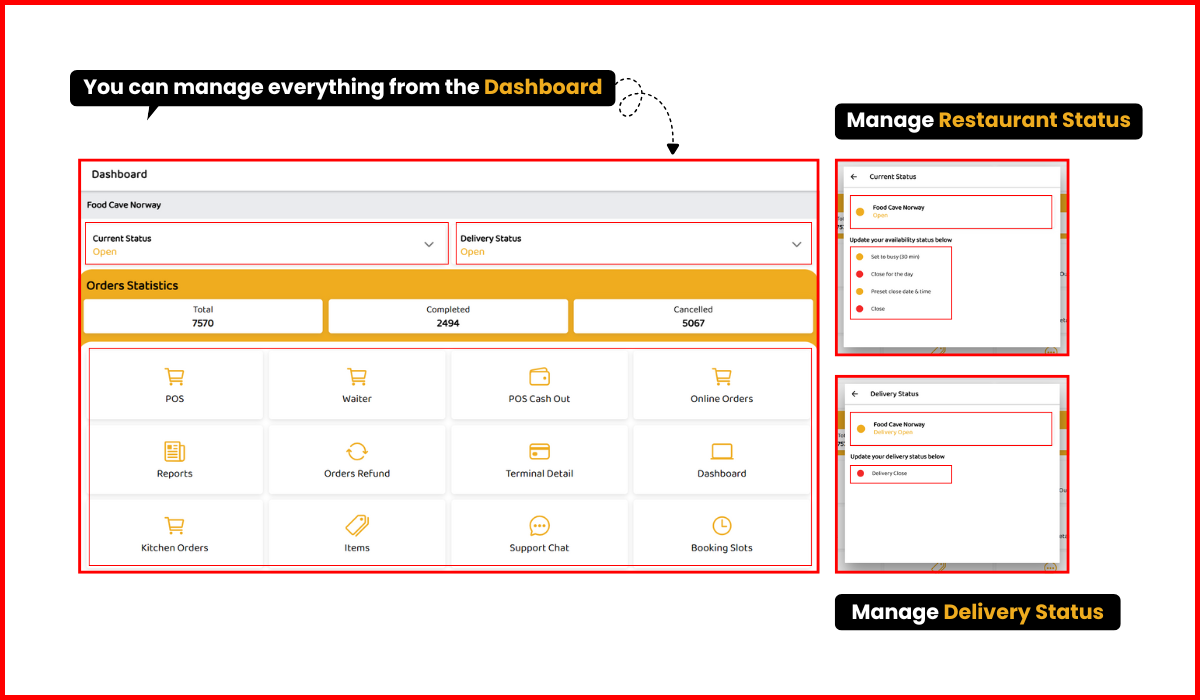
8: Dashboard
‣ Open Side Menu of POS
‣ Click option #10 "Dashboard" as shown in image
‣ Then you'll see Dashboard Page Details
‣ Current Status & Delivery Status: Both are marked as Open
‣ Click the Current Status Button
‣ The current Rx status is OPEN
‣ Update your availability status below
‣ Click the Delivery Status Button
‣ The current Rx Delivery status is OPEN
‣ Update your delivery status below
‣ Order Statistics:
For Example:
Total Orders: 7570
Completed: 2494
Cancelled: 5067
‣ Main Functions/Modules: POS, Online Orders, Sale Reports, Kitchen Orders, Sales
Receipts, Payment Receipt
‣ Items, Customers, Supplier, Purchase, Voucher, Ledger
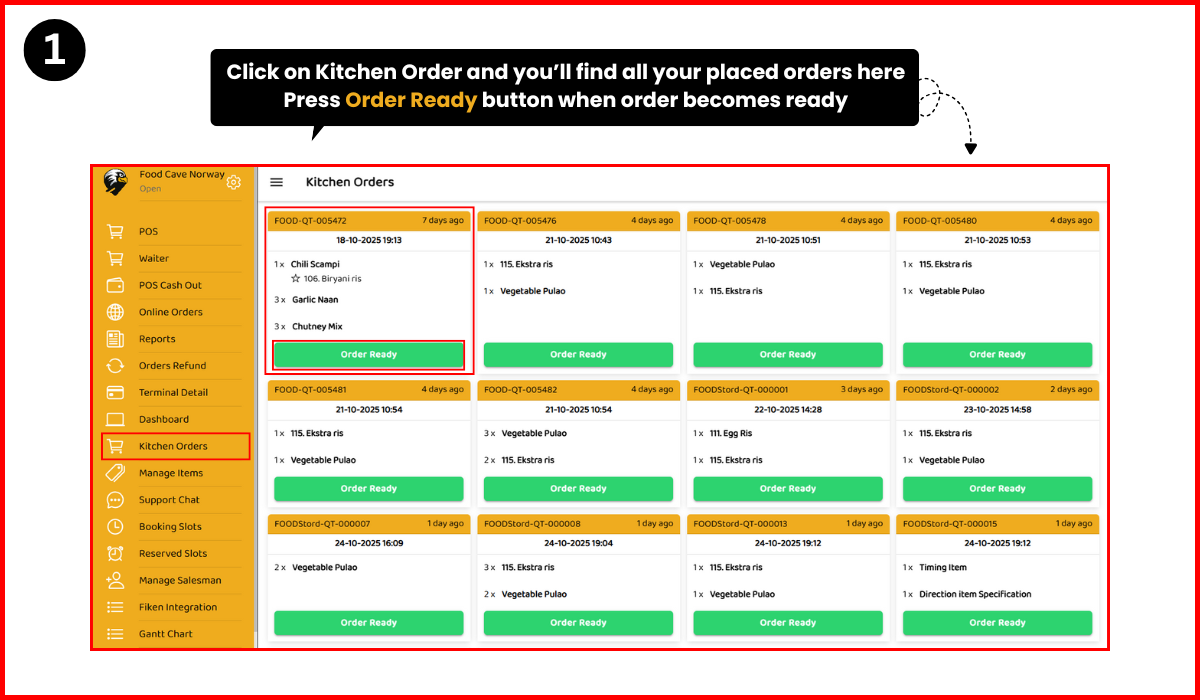
9: How can I open kitchen orders?
‣ Open Side Menu of POS
‣ Click option #11 "Kitchen Orders" as shown in image
‣ Then you'll see the Kitchen Orders Page
‣ Then Show the Kitchen Orders Page
‣ Click the Order Ready Button
‣ When you click on “Order Ready,” the order will appear in the Order Report
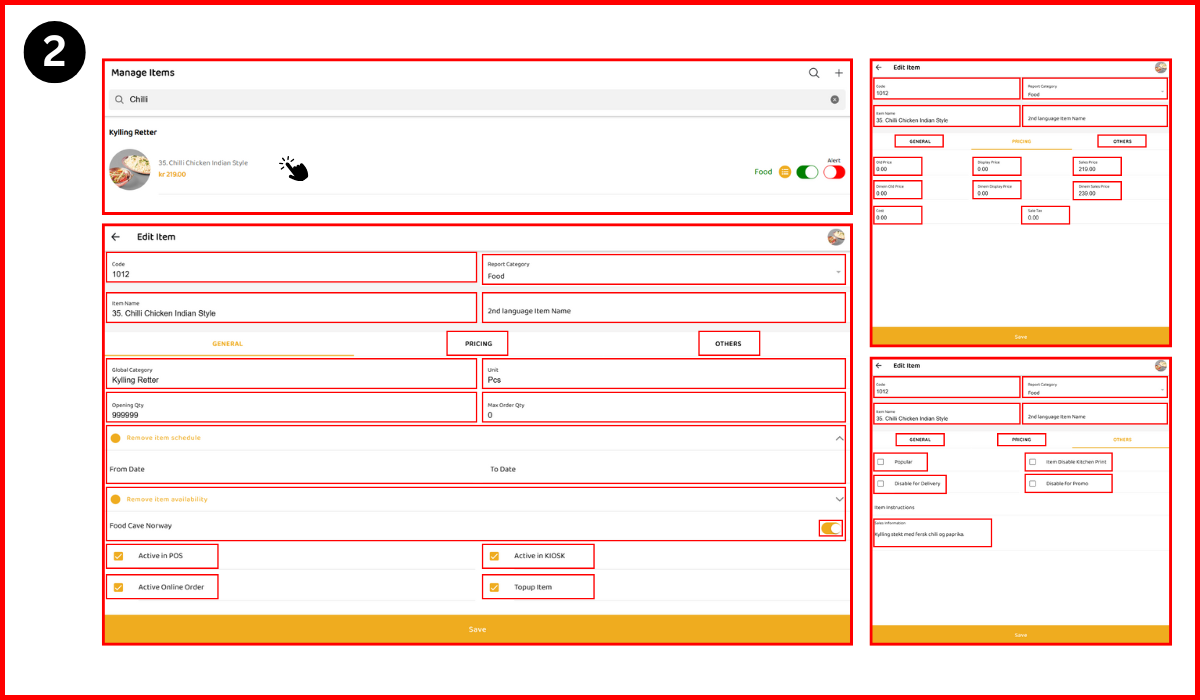
11: How can I manage menu items?
‣ Open Side Menu of POS
‣ Click option #13 "Manage items" as shown in image
‣ Then you'll see the Manage Items Page
‣ Click the Search Bar button
‣ Write Item Name
‣ Below, the search results show different items according to your search
‣ Click the exact item below you desire to search
‣ Then you'll see this Page Item Edit
‣ You can edit the item from this page
‣ Opening Qty: 0 (the starting stock)
‣ Max Order Qty: 0 (maximum order quantity allowed – currently set to zero)
‣ Click the Set item Schedule Option
‣ Set item Schedule: lets you define when the item is available (time/day wise)
‣ Click the Set item availability Option
‣ Set item availability: controls where the item is available (like branches)
‣ Set item availability: controls where the item is unavailable (like branches)
‣ Item Active in POS, KIOSK & Online
‣ Item inactive POS, KIOSK & Online
‣ Click the pricing Button
‣ Write Old Prices. Old Price: 299.00 → Previous price of the item. (takeaway)
‣ Dine-in Old Price: 328.00 → Previous dine-in price
‣ After the result Online Takeaway price
‣ After the result Online Dine-in Price
‣ Display Price: 200.00 → Price shown to customers (what they see). (takeaway)
‣ Dine-in Display Price: 300.00 → Price shown to customers for dine-in
‣ Sales Price: 0.00 → Special discounted price (if applied). (takeaway)
‣ Dine-in Sales Price: 0.00 → Special discounted dine-in price (if applied)
‣ Press the Other Option
‣ Click the check box
‣ Popular → Mark item as popular
‣ Click the check box
‣ Item Disable Kitchen Print → Kitchen printer will not print this item
‣ Click the check box
‣ Disable for Delivery → Item will not be available for delivery
‣ Click the check box
‣ Disable for Promo → Item will be excluded from promo code (Voucher)
‣ Click the drop-down button
‣ Then you'll see the pop-up
‣ Search the item instruction name
‣ Item searched & Click the Item
‣ Item Selected
‣ Item Instructions → Special notes for the item Allergens (e.g., Salted caramel croissant)
‣ Write the Sale Information
‣ Sales Information → Extra sales details (currently showing null)
‣ And Last Step Click Save Button. Then item Saved

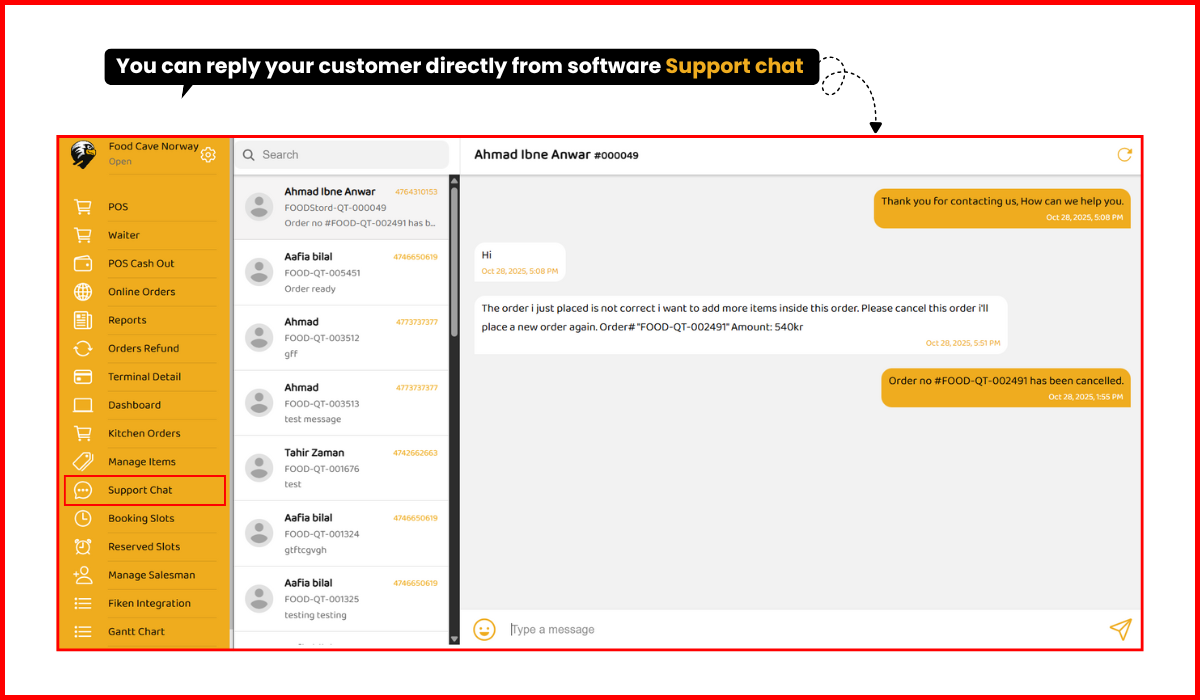
12: Where can I use support chat?
‣ Open Side Menu of POS
‣ Click option #14 "Support Chat" as shown in image
‣ Then you'll see this Support Chat Page
‣ Your customers can send you messages while placing their online order you can reply them through support chat
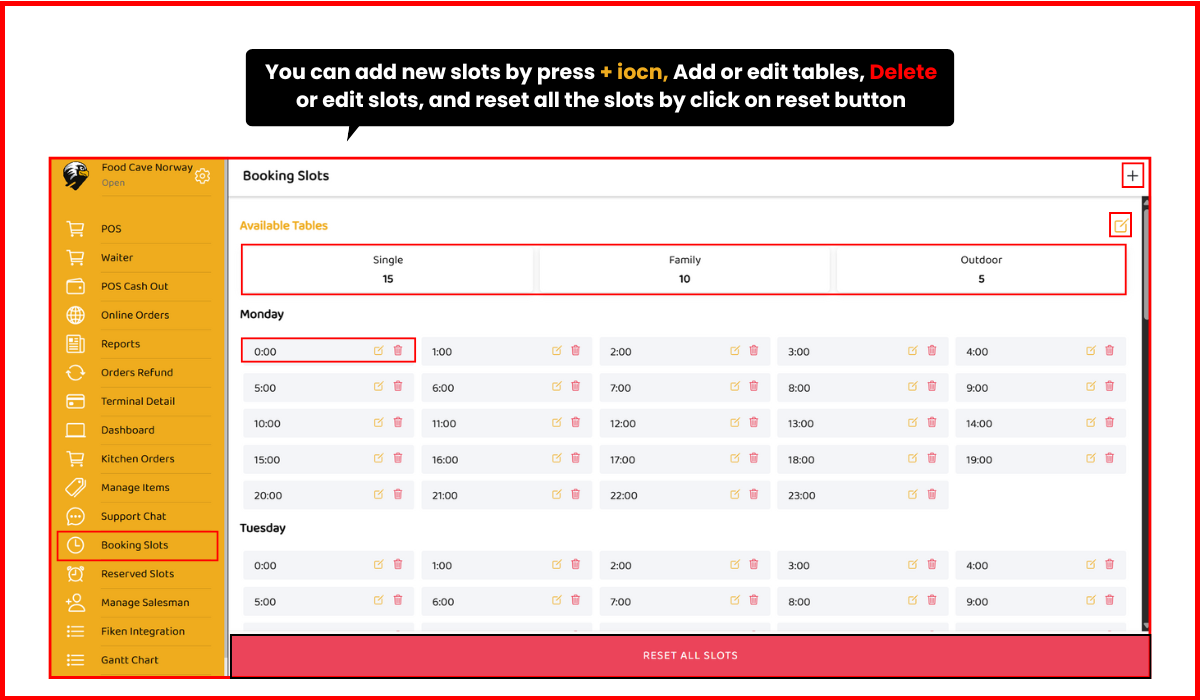
13: How do I create booking slots?
‣ Open Side Menu of POS
‣ Click option #15 "Booking Slots" as shown in image
‣ Then you'll see Booking Slots Page
‣ Click on "+" icon and start creating new time slots - Select Day, Select Time, Active the check box and press save
‣ You can also edit or delete any slot if needed
‣ You can also add your tables counts like (Single Tables= 10, Family Tables= 10, Outdoor Tables=8) as shown in image
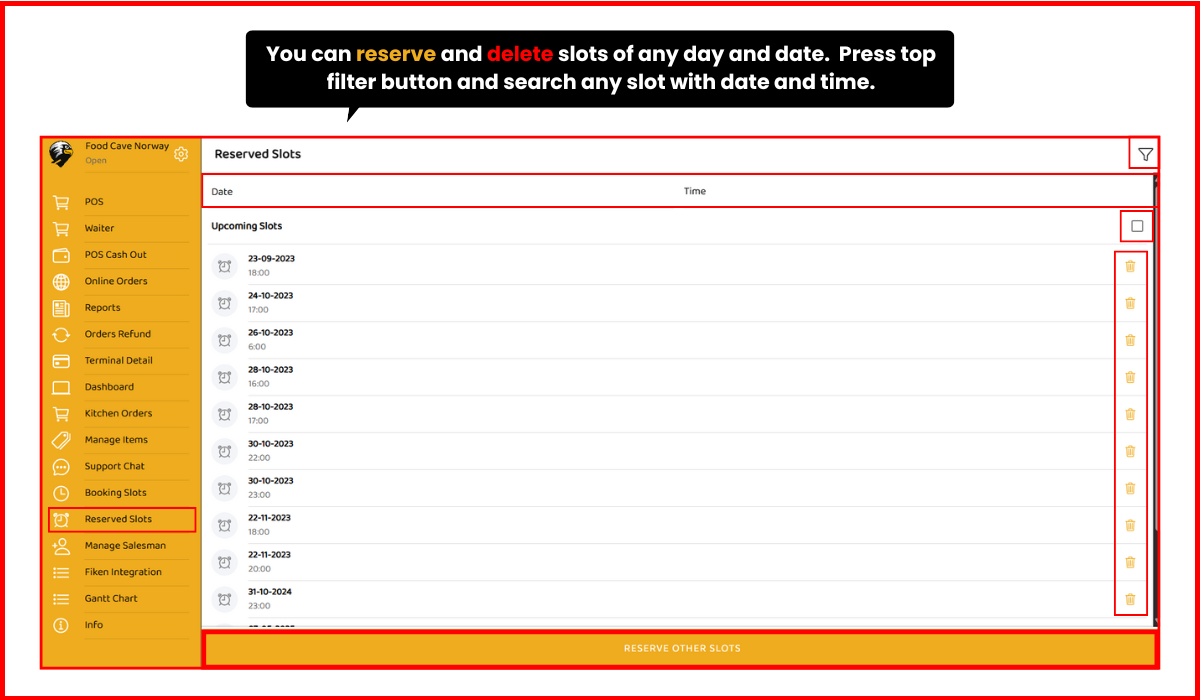
14: Where do I check reserved slots?
‣ Open Side Menu of POS
‣ Click option #16 "Reserved Slots" as shown in image
‣ Then you'll see Reserved Slots Page
‣ Click the Reserve Other Slots Button
‣ Then you'll see Pop-up Select Reserve Slots
‣ Select Slot & Click Save Button
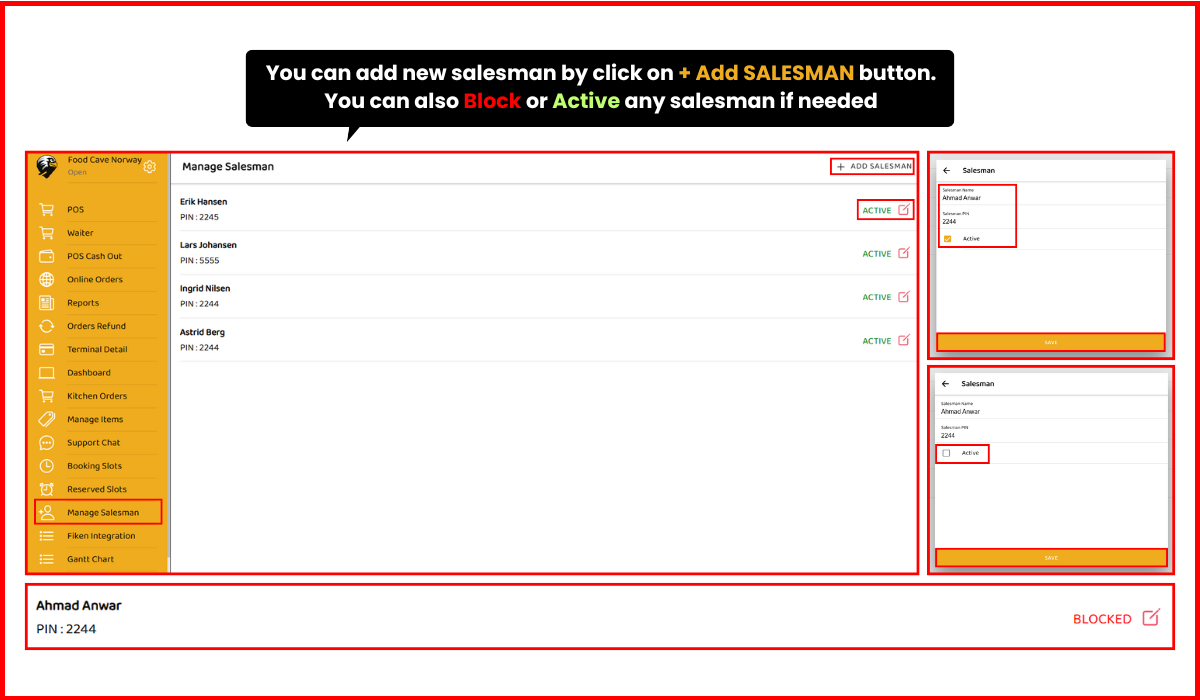
15: How can I manage salesmen?
‣ Open Side Menu of POS
‣ Click option #17 "Manage Salesmen" as shown in image
‣ Then you'll see Manage Salesman Page
‣ Click Edit Button
‣ Then you'll see Pop-up
‣ Now you can change the Name, PIN, Block or Active the salesman
‣ Click save Button
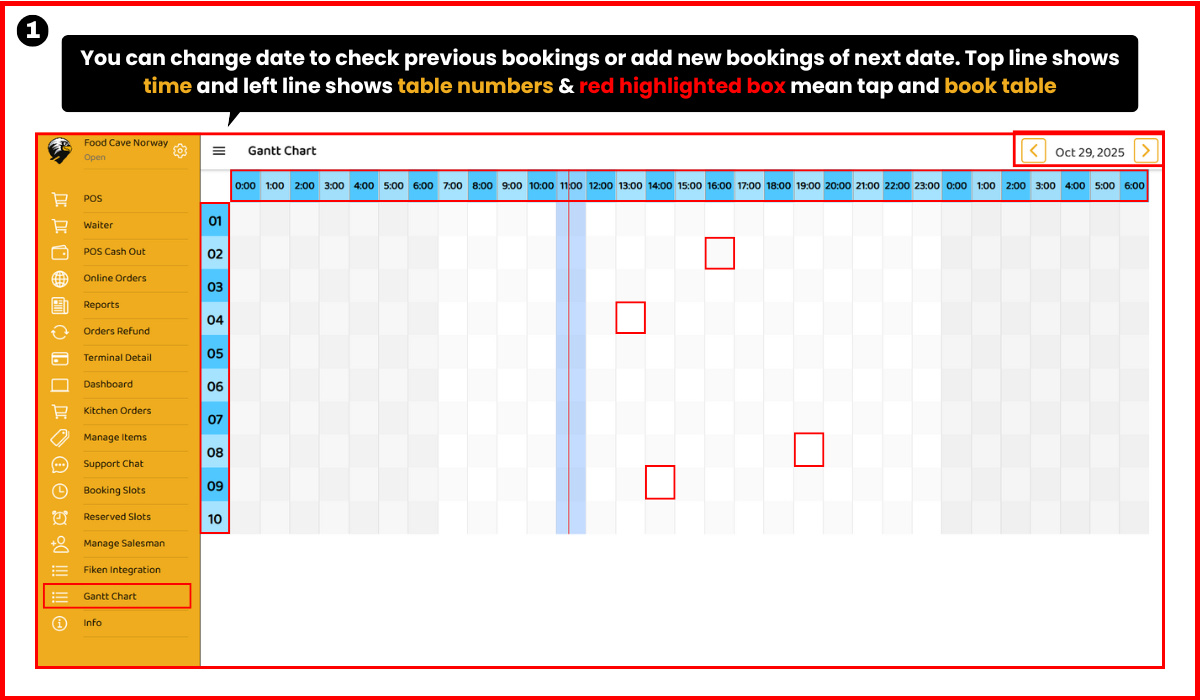
16: How do I view the Gantt chart?
‣ Open Side Menu of POS
‣ Click option #19 "Gantt Chart" as shown in image
‣ Then you'll see Gantt Chart Page
‣ Click Time Boxes
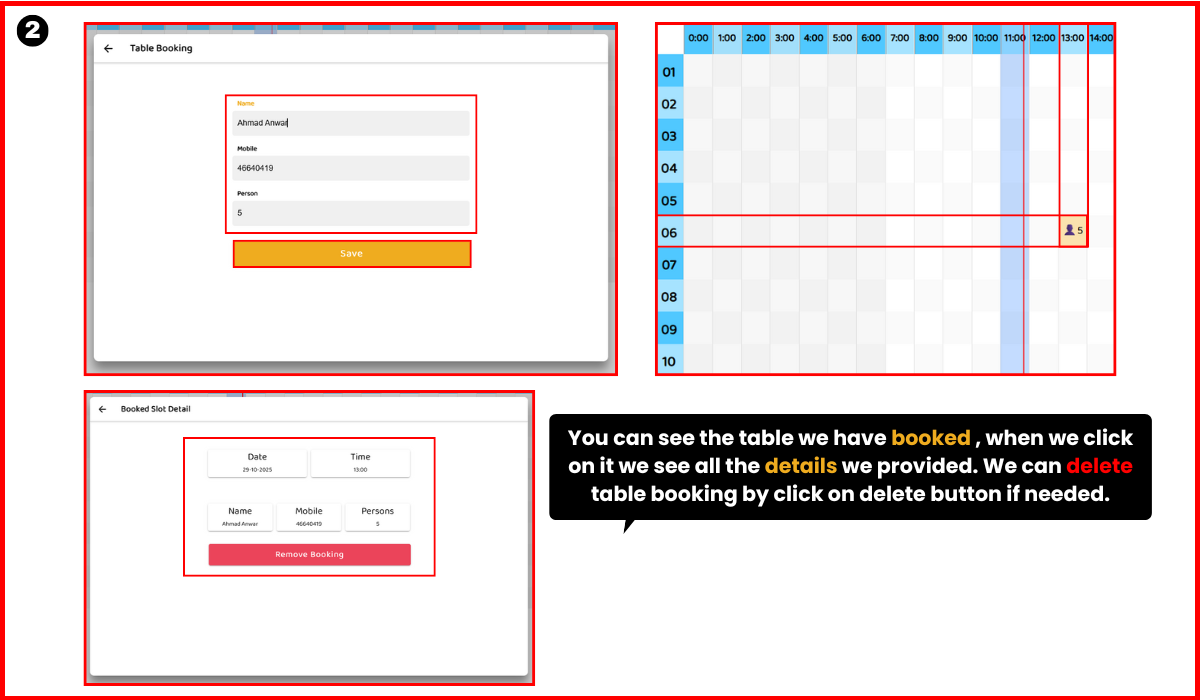
‣ Then you'll see table booking Pop-up
‣ Add Name & Mobile Number
‣ Click save Button
‣ Table booking order saved
‣ Click the Order
‣ Then you'll see Booking Details
‣ Click the Remove Booking Button
‣ Then you'll see the Booking Cancelled
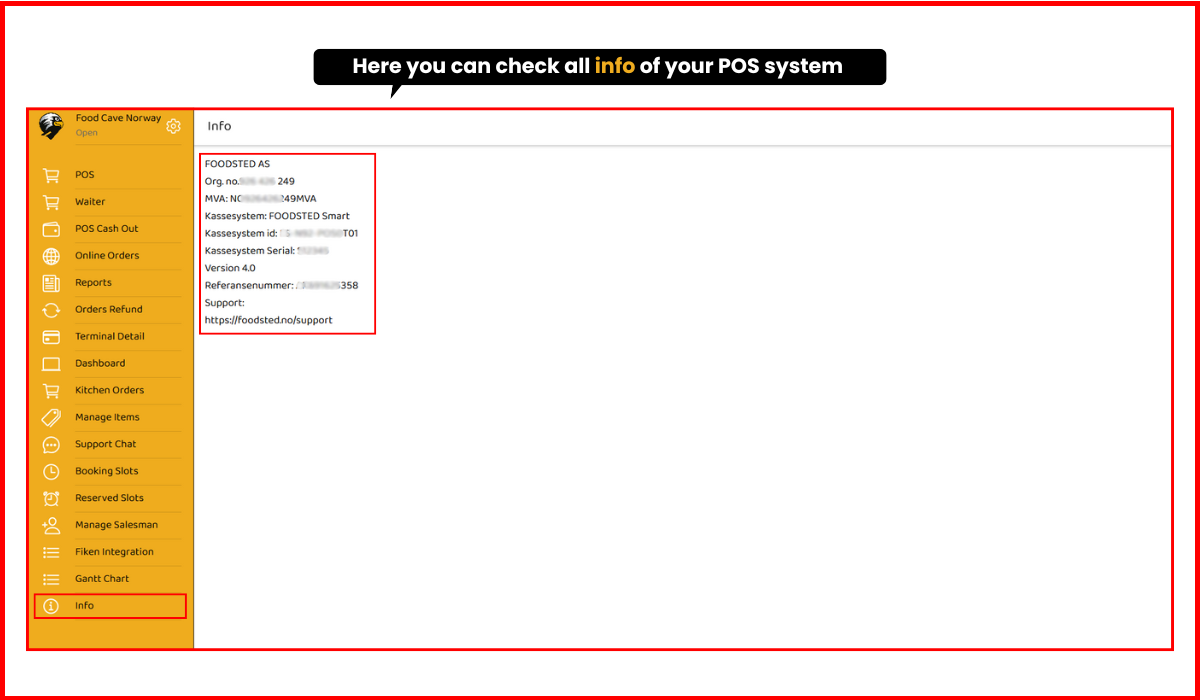
17: Where can I see POS info?
‣ Open Side Menu of POS
‣ Click last option "POS Info" as shown in image
‣ Then you'll see POS Info